As an Amazon Associate, I earn from qualifying purchases.
To open a Ninja Blender lid, twist it counterclockwise to unlock before lifting it off. Opening a Ninja Blender lid is easily done by twisting it counterclockwise to unlock, then lifting it off.
Ninja blenders are known for their powerful performance and versatility in the kitchen. They feature a secure lid that helps prevent any spills or splatters during blending. Whether you’re making smoothies, soups, or sauces, knowing how to properly open and close the lid of your Ninja Blender is essential for a smooth blending experience.
We will guide you through the simple steps to open a Ninja Blender lid effortlessly.
Credit: www.reddit.com
Understanding The Lid Design
To open the lid of your Ninja blender smoothly, start by locating the release tabs on each side. Squeeze them gently and lift the lid off to access the contents. Understanding the lid design is crucial for hassle-free blending sessions.
Understanding the Lid Design
Exploring Ninja Blender Lid Components
Safety Features
The lid of a Ninja blender plays a crucial role in ensuring safe operation and preventing any unwanted spillage during blending. Understanding the design of the lid, its components, and safety features is fundamental to successful and hassle-free usage.
Exploring Ninja Blender Lid Components
The lid of a Ninja blender primarily consists of a main lid, gasket, spout, locking tabs, and the center cap. The main lid provides a secure seal over the pitcher, preventing leaks and ensuring a smooth blending process. The gasket serves as a seal to prevent liquids from seeping out, while the spout facilitates easy pouring without the need to remove the entire lid. The locking tabs play a vital role in securing the lid in place during blending, while the center cap allows for the addition of ingredients during the blending process.
Safety Features
Ninja blender lids are designed with several safety features to prevent accidents and ensure user protection. The interlocking tabs ensure that the lid is securely in place before the blender can be activated, providing peace of mind and preventing any potential spills. Additionally, the safety lock mechanism ensures that the blender does not operate unless the lid is properly aligned and locked, reducing the risk of accidents during use.
Understanding the lid design of a Ninja blender is essential for optimal usage and safety. By familiarizing yourself with the lid components and safety features, you can enhance your blending experience while prioritizing safety.
Credit: www.hometalk.com
Step-by-step Guide To Opening The Lid
Unlocking the lid of your Ninja Blender can be a simple process if you follow these step-by-step instructions. To begin, firmly grip the lid handle and twist counterclockwise to release it. With a gentle lift, the lid will come off easily, allowing you to access your delicious creations inside.
Step 1: Ensuring The Blender Is Switched Off
Before attempting to open the lid of your Ninja blender, it is crucial to ensure that the blender is switched off and disconnected from the power source. This step is essential for your safety and to avoid any accidents or injuries. Double-check that the power button is in the “off” position and that the blender is not plugged into an electrical outlet.
Step 2: Locating The Lid Release Tabs
Next, you need to locate the lid release tabs on your Ninja blender. These tabs are strategically placed on the blender to secure and release the lid when needed. Typically, you can find them on the sides of the lid, near the handle or on the front and back of the lid. These tabs can vary depending on the model of your Ninja blender, so refer to the user manual or the manufacturer’s website for specific instructions.
Step 3: Releasing The Lid
Once you have identified the lid release tabs, it’s time to open the lid. Gently press down on the lid release tabs simultaneously while holding the blender securely with your other hand. This action will unlock the lid and allow you to lift it open. Make sure to exert even pressure on both tabs to release the lid smoothly. Avoid using excessive force or twisting the lid, as this may damage the blender or the lid itself.
Step 4: Removing The Lid
With the lid released, you can now remove it from your Ninja blender. Lift the lid carefully, ensuring that you don’t spill any contents that may be inside. Set the lid aside in a safe place, away from the blender and any other objects. It is important to handle the lid with care to prevent any accidental injuries or spills.
Step 5: Cleaning And Reassembling
After using your Ninja blender, it’s important to clean the lid thoroughly to maintain hygiene and prevent any residue from affecting the blending experience. Follow the manufacturer’s instructions for cleaning the lid, as different models may have specific requirements. Once the lid is clean and dry, you can reassemble it by aligning the tabs with the corresponding slots on the blender, and gently pressing down until you hear a click or feel it securely in place.
By following this step-by-step guide, you can easily open the lid of your Ninja blender and use it with confidence. Remember to always prioritize safety and refer to the user manual or manufacturer’s instructions for your specific model.
Tips For Easy Lid Opening
To ensure effortless lid opening on your Ninja Blender, follow these simple yet effective tips for easy lid opening. By mastering the proper handling and alignment techniques, you can quickly access your blender’s contents without any hassle.
Handling The Lid Gasket Carefully
When removing the lid gasket, grip it gently and avoid applying too much force.
Ensure the gasket is clean and properly seated before attempting to open the lid.
Avoid using sharp objects or excessive pressure which can damage the gasket.
Proper Lid Alignment
Line up the lid with the handle and pitcher spout for accurate alignment.
Check that the lid tabs are securely placed in the designated slots on the pitcher.
Rotate the lid slightly to confirm it is properly locked in position before opening.
Cleaning And Maintenance
When it comes to the cleaning and maintenance of your Ninja blender lid, it’s essential to keep it in top condition for optimal performance. Proper cleaning and regular inspection will not only extend the lifespan of your blender but also ensure that your food and beverages remain safe and hygienic. In this section, we will cover the essential steps for keeping your Ninja blender lid clean and well-maintained.
Removing Residue From Lid Seals
To effectively remove residue from the lid seals, follow these simple steps:
- Start by carefully removing the lid from the blender.
- Inspect the seals for any food or liquid residue.
- Use a gentle cleaning brush or cloth to wipe away any buildup.
- Rinse the seals thoroughly under running water to ensure all residue is removed.
- Dry the seals completely before placing the lid back on the blender.
Lid Inspection For Wear And Tear
Regular inspection of the lid is crucial to identify any signs of wear and tear that may affect its performance. Here’s how to perform a quick but thorough inspection:
- Check for any cracks, tears, or deformities in the lid seals.
- Inspect the lid for any loose parts or damage to the locking mechanism.
- If any issues are detected, refer to the user manual for guidance on replacement parts or maintenance.
- Ensure the lid is securely attached to the blender before each use.
Troubleshooting
Learn how to easily troubleshoot and open the lid of your Ninja Blender with these simple steps.
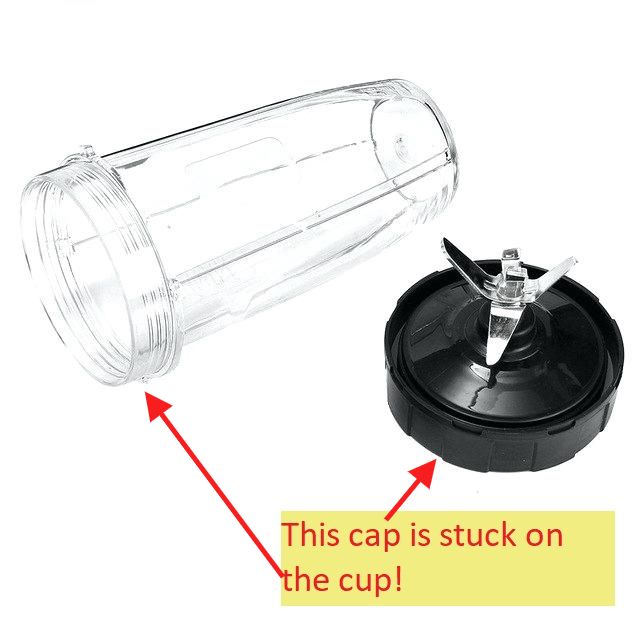
Lid Stuck Closed
If you find that the lid of your Ninja Blender is stuck closed, don’t fret. There are a few simple steps you can take to troubleshoot the issue.
First, ensure that the blender is not currently in use and that it is completely powered off. This will prevent any accidents while attempting to open the lid.
Next, inspect the lid to see if there are any visible obstructions or debris that may be preventing it from opening. If so, carefully remove any foreign objects with a soft cloth or gentle tool.
If there are no visible obstructions, it’s possible that the lid may be suctioned shut due to an excess buildup of pressure. In this case, try releasing the pressure by turning the blender upside down and gently tapping the bottom to dislodge any air pockets.
Another potential cause for a stuck lid could be a faulty locking mechanism. Check to see if the locking tabs on the lid and the blender base are aligned properly. If not, realign them and try to open the lid again.
If none of these methods work, it may be necessary to contact Ninja customer support for further assistance. They can provide you with specific troubleshooting steps or arrange for a replacement lid if needed.
Loose Lid Seal
Sometimes, you may encounter an issue with a loose lid seal on your Ninja Blender. This can lead to leaks or difficulties with blending. Fortunately, this problem can be easily resolved with a few simple steps.
First, check the seal around the lid to see if it is properly aligned and intact. If it appears misaligned or damaged, gently remove it and clean both the seal and the lid with warm soapy water.
Once cleaned and dried, reattach the seal to the lid, ensuring that it snaps securely into place. This will ensure a tight and proper seal when the lid is closed.
If the seal is in good condition but still not providing a tight fit, try applying a small amount of vegetable oil to the seal to lubricate it. This can help create a better seal and prevent any leaks during blending.
Remember, it’s important to regularly inspect the lid seal and replace it if it becomes worn or damaged over time. This will help maintain the performance and efficiency of your Ninja Blender.
In conclusion, troubleshooting lid issues with your Ninja Blender doesn’t have to be a daunting task. By following these simple steps, you can easily troubleshoot a lid that is stuck closed or has a loose seal. Remember to handle any obstructions or pressure buildup with care to avoid any accidents. And if all else fails, don’t hesitate to reach out to Ninja customer support for further assistance. Happy blending!

Credit: www.reddit.com
Using The Blender Safely
When using your Ninja blender, it’s essential to prioritize safety. From properly securing the blender lid to managing the power connections, these simple precautions can help prevent accidents and ensure a smooth blending process.
Blender Lid
To open a Ninja blender lid, ensure that the blender is turned off and unplugged to prevent any mishaps. Then, firmly grasp the lid and twist it counterclockwise to unlock it. Once unlocked, carefully lift the lid to access the blender’s contents. After use, lock the lid back in place by twisting it clockwise until it securely fastens.
Power Connection
Before plugging in your Ninja blender, thoroughly inspect the power cord for any signs of damage. Always plug the blender into a grounded outlet and avoid using extension cords to reduce the risk of electrical hazards. When in use, keep the power cord away from water and hot surfaces to maintain safety while blending.
- Always unplug the blender before removing or securing the lid
- Inspect the lid gasket for proper alignment to prevent leaks
- Avoid overfilling the blender jar to prevent spills and excess pressure
- Regularly clean the blender base to prevent electrical malfunctions
Frequently Asked Questions Of How To Open A Ninja Blender Lid
How Do You Release The Lid On A Ninja Blender?
To release the lid on a Ninja blender, twist it counterclockwise and lift it up. It should come off easily.
How Do You Open The Lid Of A Blender?
To open the lid of a blender, firmly grasp the handle and twist it counterclockwise. Lift the lid carefully to avoid spilling the contents.
Why Wont My Blender Cap Open?
The blender cap may be stuck due to improper alignment or over-tightening. Try adjusting the cap position or gently tapping it to release pressure.
How Do You Open A Stuck Ninja Bottle?
To open a stuck ninja bottle, follow these steps: 1. Wrap a towel around the lid for a better grip. 2. Tap the lid gently with a spoon or a rubber mallet to loosen it. 3. Use hot water to expand the metal, making it easier to open.
4. If all else fails, try using a bottle opener or a pair of pliers. 5. Be cautious and go slow to avoid accidents. Remember, safety comes first.
Conclusion
To recap, opening a Ninja blender lid is a simple yet crucial step in utilizing this powerful kitchen appliance. By following the aforementioned tips and tricks, you can easily unlock the lid’s secure mechanism and gain access to the blender’s contents.
Remember to handle the lid with care and always prioritize safety while working with the blender. With these techniques at your disposal, you can confidently prepare delicious smoothies, sauces, and soups using your Ninja blender. Happy blending!
As an Amazon Associate, I earn from qualifying purchases.